HAProxy, or High Availability Proxy, is a highly effective open-source tool for HTTP load balancing and proxying. It improves website and application performance by distributing traffic across multiple backend servers. This helps reduce response times, increase throughput, and ensure your services remain available even during high traffic periods.
While the standard version of HAProxy is free, there’s also a commercial version called HAProxy Enterprise. It offers additional features, expert support, and professional services for those who need extra functionality or assistance.
No matter which version you choose, HAProxy offers a variety of load balancing methods to suit different needs:
- Round Robin: Distributes traffic evenly among servers in a rotating order.
- Least Connections: Routes traffic to the server with the fewest active connections, making it ideal for servers with varying performance capabilities.
- Least Time: Sends requests to the server that responds the fastest.
- Source IP Hash: Ensures requests from the same IP address are consistently routed to the same server by using a hash function.
- Random with Two Choices: Picks two servers randomly and sends the request to the one with fewer connections.
In this guide, we’ll show you how to install and set up HAProxy on Almalinux 9. We will use Round Robin as the load-balancing method.
SET UP #
For the purpose of demonstrating this, we have a set up that looks like this
| Node | Hostname | IP address |
|---|---|---|
| HAProxy | loadba.tke.co.ke | 102.212.245.130 |
| Web Server 1 | node-a.tke.co.ke | 102.212.245.54 |
| Web Server 2 | node-b.tke.co.ke | 102.212.246.99 |
| Web Server 3 | node-c.tke.co.ke | 102.212.245.17 |
Step 1: Configure Hostnames (All Nodes)
- We will assign hostnames for each ot the nodes. The hostnames are valid subdomain, each pointing to the respective node’s IP, as in the table above.
- We will use the command below to assign hostname
sudo hostnamectl set-hostname loadba.tke.co.ke

exec bash
sudo hostnamectl set-hostname node-a.tke.co.ke

exec bash
sudo hostnamectl set-hostname node-b.tke.co.ke

exec bash
sudo hostnamectl set-hostname node-c.tke.co.ke

exec bash
Step 2: Install vim on each node (optional if you use nano)
- You will need the vim editor for the next step. Use the command below to install it
sudo dnf install vim -yStep 3: Configure /etc/hosts file for All Nodes
- Let’s now set all the nodes to communicate seamlessly in the environment. You do that by configuring /etc/hosts file for each node
sudo vi /etc/hosts- Then add the following lines;
102.212.245.130   loadba.tke.co.ke
102.212.245.54   node-a.tke.co.ke
102.212.246.99   node-b.tke.co.ke
102.212.245.17   node-c.tke.co.ke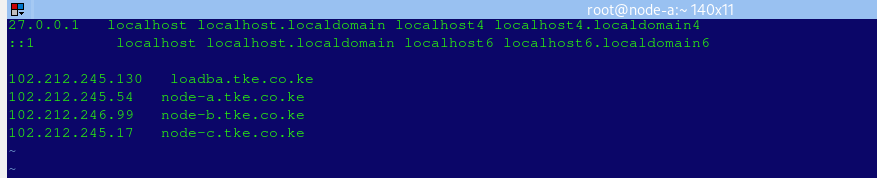
- Save the files and exit, then do a ping test on each node or each of the other nodes.

Step 4: Install HAProxy on Almalinux 9 Load Balancer (loadba.tke.co.ke)
- We will now install the HA Proxy on the load balancee node, but first we’ve got to update system packages
sudo dnf update- Then install the package
sudo dnf install haproxy -y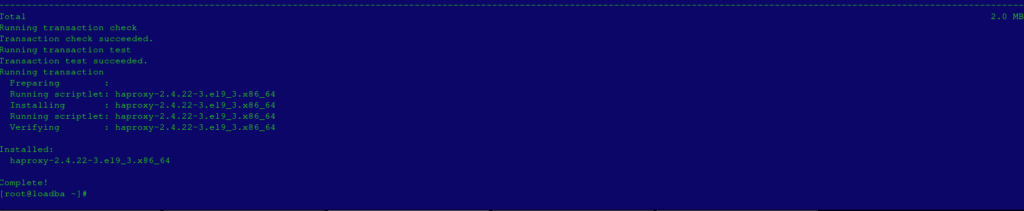
- Once done, you can check the HA Proxy version using the command below
rpm -q haproxy- You can get the same info and much more by including the -i option
rpm -qi haproxy- From the result, you will have rich information on the name, version, release, architecture, and installation date among other details. Our output, shows that we have installed HAProxy version 2.4.22.

Step 5: Configure HAProxy
- Next will be to configure HA Proxy to serve requests to our three back-end servers. Before that, we will first make a copy of the HA Proxy configuration file, before we start editing it. Use the command below. A file called haproxy.org will be created in /etc/haproxy/ with content of haproxy.cfg
sudo cp /etc/haproxy/haproxy.cfg{,.orig}- Now we need to configure these settings;
- Front-end settings tospecify the sockets coming from client connections.
- Back-end settings to specify the HAProxy server IP address and the load balancer algorithm.
Front-End Settings #
- Open the haproxy config file using the command below
sudo vim /etc/haproxy/haproxy.cf- Navigate to a section called #Front load balancer. Check to confirm that you have these lines of code. Replace 102.212.245.130:80 with your HA Proxy node IP.
# Front load balancer

frontend load_balancer
    bind 102.212.245.130:80
    option http-server-close
    option forwardfor
    stats uri /haproxy?stats

default_backend   webservers
Back-End Settings #
- Here we will specify roundrobon as the load-balancing algorithms. Also, we will specify the back-end servers alondode their hostnames and IP Addresses
backend webservers
    mode        http
    balance     roundrobin

    option httpchk HEAD / HTTP/1.1\r\nHost:\ localhost
    server node-a.tke.co.ke  102.212.245.54:80  check
    server node-b.tke.co.ke  102.212.246.99:80  check
    server node-c.tke.co.ke  102.212.245.17:80  check

Statistics Settings #
- To view the load balancer statistics in a web browser, add the following block of code to the configuration file. Replace 102.212.245.130 with your HA Proxy node IP,
- Also in the code bellow, note the line with stats auth admin:P@ss!# and replace admin and P@ss!# with a username and password of choice. Note them for later use.
listen stats
    bind  102.212.245.130:80      # Bind stats to port 80
    log   global             # Enable Logging
    stats enable             # enable statistics reports
    stats hide-version       # Hide the version of HAProxy
    stats refresh 30s        # HAProxy refresh time
    stats show-node          # Shows the hostname of the node
    stats auth admin:P@ss!#   # Authentication for Stats page
    stats uri /stats     # Statistics URLi
- Save the changes and exit the configuration file.
Step 6: Configure SELinux
- Next will be to set SE Linux on HA Proxy node to allow access to HTTP Traffic. You can use these commands
sudo setenforce 0

sudo sed -i 's/SELINUX=enforcing/SELINUX=permissive/g' /etc/selinux/config
Step 7: Configure Rsyslog
To keep tabs on HAProxy’s performance, it’s recommended that you configure log files that will store logs generated by HAProxy. Rsyslog is a utility supports loggin and provides a way to collect and centralize logs
- Access Rsyslog configuration file
sudo vim /etc/rsyslog.conf- Then add the following lines, to the file.
local2.=info     /var/log/haproxy-access.log

local2.notice    /var/log/haproxy-info.log
Step 8: Start and Enable HAProxy
sudo systemctl start haproxy

sudo systemctl enable haproxy
Step 8: Install Apache Web Server on Web Servers
- We are will now configure the back-end servers so that they server the traffic. We wil do tha by installing Apache on each of them. If you prefer Litespeed or Nginx, you can give it a swing. Run the commands below on each of the web servers.
sudo dnf update

sudo dnf install httpd -y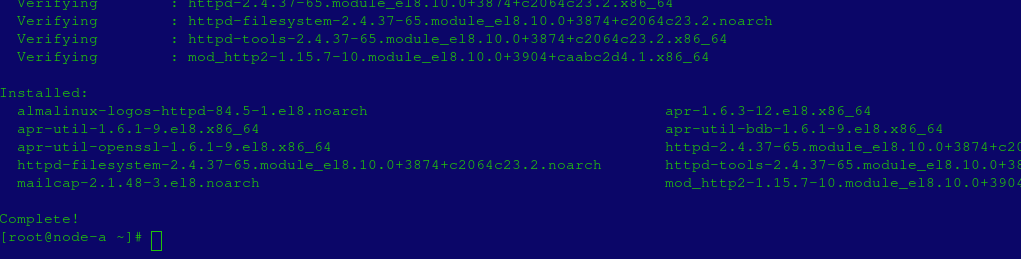
- Once done, you can now create a test web-page for each server for the purpose of simulating the roundrobin load balancing algorithim
sudo vim /var/www/html/index.html- Then put these lines of code
For Web Server 1
<!DOCTYPE html>
<html lang="en">
<head>
<meta charset="UTF-8">
<meta name="viewport" content="width=device-width, initial-scale=1.0">
<title>Welcome to Web Server 01</title>
<style>
body {
font-family: Arial, sans-serif;
background-color: #f4f4f9;
color: #333;
text-align: center;
padding: 20px;
}
h1 {
color: #4CAF50;
}
p {
font-size: 1.2em;
margin: 10px auto;
max-width: 600px;
}
.server-info {
font-weight: bold;
color: #555;
margin-top: 20px;
}
footer {
margin-top: 40px;
font-size: 0.9em;
color: #888;
}
</style>
</head>
<body>
<h1>Welcome to node-a.tke.co.ke 😊</h1>
<p>Your request has been successfully served! This page is brought to you by Web Server 01, ensuring a smooth and reliable experience.</p>
<div class="server-info">
Server IP: <strong>192.168.1.101</strong><br>
Load Balancer: Active
</div>
<footer>
© 2024 Web Server 01 | Powered by Your Reliable Hosting
</footer>
</body>
</html>
For Web Server 2
<!DOCTYPE html>
<html lang="en">
<head>
<meta charset="UTF-8">
<meta name="viewport" content="width=device-width, initial-scale=1.0">
<title>Welcome to Web Server 01</title>
<style>
body {
font-family: Arial, sans-serif;
background-color: #f4f4f9;
color: #333;
text-align: center;
padding: 20px;
}
h1 {
color: #4CAF50;
}
p {
font-size: 1.2em;
margin: 10px auto;
max-width: 600px;
}
.server-info {
font-weight: bold;
color: #555;
margin-top: 20px;
}
footer {
margin-top: 40px;
font-size: 0.9em;
color: #888;
}
</style>
</head>
<body>
<h1>Welcome to node-b.tke.co.ke 😊</h1>
<p>Your request has been successfully served! This page is brought to you by Web Server 01, ensuring a smooth and reliable experience.</p>
<div class="server-info">
Server IP: <strong>192.168.1.101</strong><br>
Load Balancer: Active
</div>
<footer>
© 2024 Web Server 01 | Powered by Your Reliable Hosting
</footer>
</body>
</html>
For Web Server 3
<!DOCTYPE html>
<html lang="en">
<head>
<meta charset="UTF-8">
<meta name="viewport" content="width=device-width, initial-scale=1.0">
<title>Welcome to Web Server 01</title>
<style>
body {
font-family: Arial, sans-serif;
background-color: #f4f4f9;
color: #333;
text-align: center;
padding: 20px;
}
h1 {
color: #4CAF50;
}
p {
font-size: 1.2em;
margin: 10px auto;
max-width: 600px;
}
.server-info {
font-weight: bold;
color: #555;
margin-top: 20px;
}
footer {
margin-top: 40px;
font-size: 0.9em;
color: #888;
}
</style>
</head>
<body>
<h1>Welcome to node-c.tke.co.ke 😊</h1>
<p>Your request has been successfully served! This page is brought to you by Web Server 01, ensuring a smooth and reliable experience.</p>
<div class="server-info">
Server IP: <strong>192.168.1.101</strong><br>
Load Balancer: Active
</div>
<footer>
© 2024 Web Server 01 | Powered by Your Reliable Hosting
</footer>
</body>
</html>

- Save the changes and exit.
Step 10: Test the HAProxy Load Balancer
With all done, let’s see if the load balancing round-robin works by accessing each of the webpages
http://102.212.245.54
http://102.212.246.99
http://102.212.245.17- When you first the pages, you will first see the same page from the three web servers

- When you reload the pages, you will see a response being served by the second web server
- Another reload will have requests served by the third web server
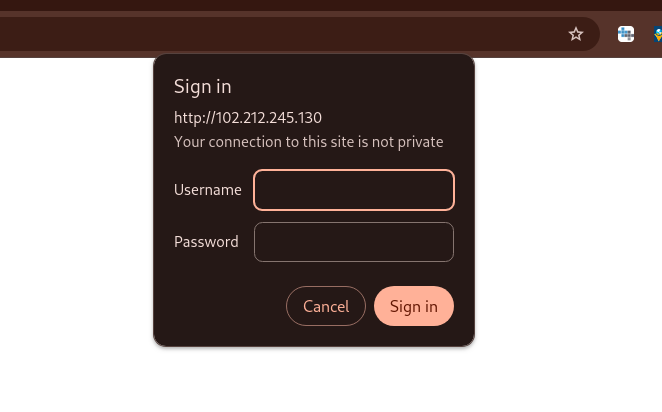
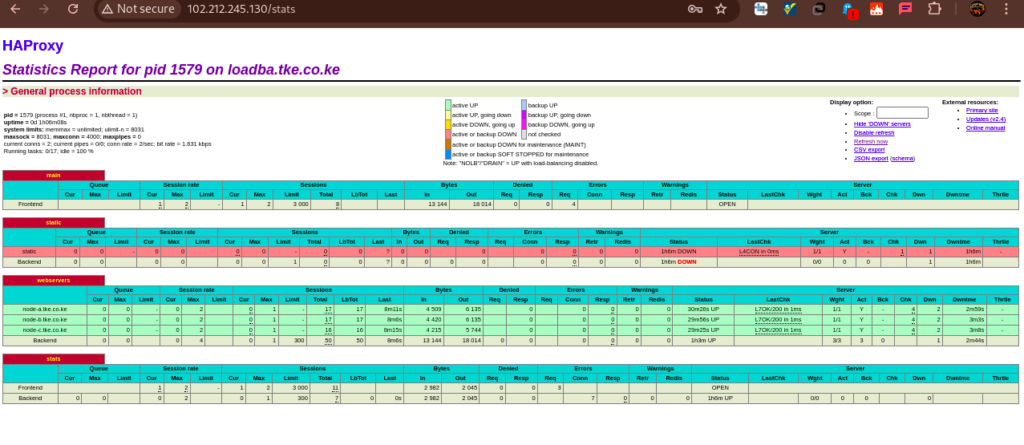
- In addition, you can view statistics using the following URL, where haProxy_IP_Address is the IP of the ha-proxy node
http://haProxy_IP_Address/stats- An authentication pop-up will appear. Provide the username and password specified in the ‘Statistics’ section under Statistics Settings section, and click ‘Sign in’.
- You will see the HAProxy statistics report page on your browser.
Author’s Final Word #
This guide has covered the installation of HAProxy on RHEL 9. As a load balancer, HAProxy is essential for efficiently managing network traffic, reducing downtime by intelligently routing web traffic to available nodes while faulty ones are repaired and brought back online.