Backing up MySQL databases regularly is crucial to protect your data from unexpected loss due to server crashes, hardware failures, or accidental deletion. You can automate this process using a cron job, which runs a scheduled script to create backups at regular intervals. This guide will walk you through the steps to automatically back up your MySQL databases using cron.
Prerequisites: #
- A server running MySQL or MariaDB.
- Access to a user account with the necessary MySQL permissions. If you want to back up all databases, you could need a user like root and the root mysql database password
- You need your database name, database user and password
- Access to the terminal (with sudo privileges).
This can be done in various ways. We will explain how to do it using these two methods
- By Including MySQL login information in the cron job command
- Using a Backup Script
Method 1: By Including MySQL login information in the cron job command #
- First start by creating the directory where you want to store the backup files.
- I will keep mine in /home/dbbackup

You can then schedule your MySQL database backups by creating a cron job that run the backup command below;
/usr/bin/mysqldump --routines -u dbusername -p'dbpassword' dbname > /path/to/backup.sql- In the above command, replace dbusername with the name of the database user, dbusername with the name of the database that you are backing up and /path/to with the name of the directory where you want to put the backup file.
- You first need to run the command manually on terminal to see if it outputs the desired result. Once you verify that, you can now automate it with a command.
I will back up a database called fbtdl_demodb to a directory called /home/dbbackup
/usr/bin/mysqldump --routines -u fbtdl_demodbu -p'qsPGoGJLkwDiyux' fbtdl_demodb > /home/dbbackup/fbtdl_demodb.sql
Our backup is successful as in the image above and we can use the ls command to see that the backup is there

- We will then create a cronjob that runs the command every day at midnight. You can use this tool to know the right values for your cron.
- For the command to run every midnight, I will set the command as below
0 0 * * * /usr/bin/mysqldump --routines -u fbtdl_demodbu -p'qsPGoGJLkwDiyux' fbtdl_demodb > /home/dbbackup/fbtdl_demodb.sql- Note that in the above, this 0 0 * * * is what tells the command to run every midnight
- You can use crontab guru to set your desired values that correspond to your desired timings, then put then in crontab
- Go to your server’s terminal and type the command below, to open crontab, as in in in the image below
crontab -e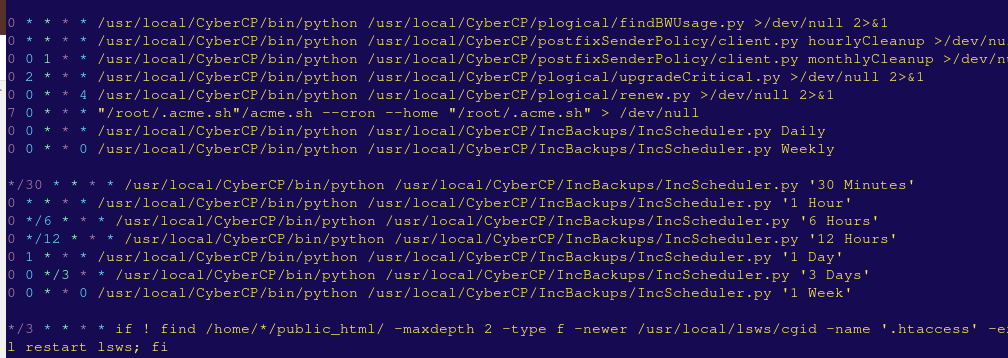
- If the crontab opened with vi editor, press letter “i” to enter insert mode, then add your command somewhere in the crontab

- You then press ESC to exit the insert node, then :wq followed by Enter, to save
- You have set the cron to do backups on daily basis
Note that that backups could be taking the server space, thus you will need to monitor and remove those that need to be removed. You could use automation scripts to do thi.
Note that Truehost support does not give support on how to do these custom configurations. However, if you have a question that relates to your databases, you can contact the support team
Method 2: Using a Backup Script #
You can also use a script to do these automation
Step 1: Create a Backup Directory #
- First, you need a directory to store your MySQL backups. Create a directory in your server’s filesystem to hold the backup files.
sudo mkdir -p /home/dbbackup/

sudo chmod 700 /home/dbbackup/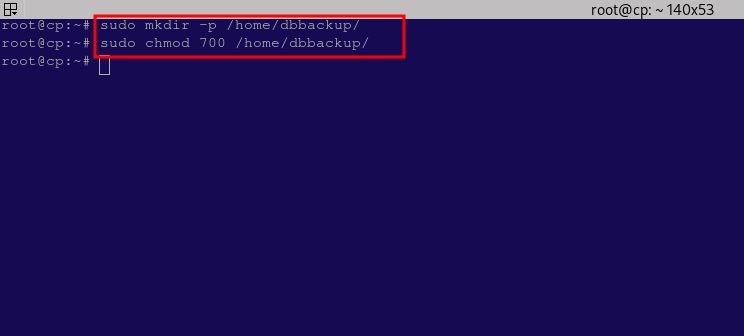
Step 2: Create a MySQL Backup Script #
- Next, you’ll create a shell script that will handle the backup process. You can write this script in any directory. I would sugegst that you use
/usr/local/bin/for system-wide scripts. - Open a text editor to create the script:
sudo vi /usr/local/bin/mysql_backup.sh
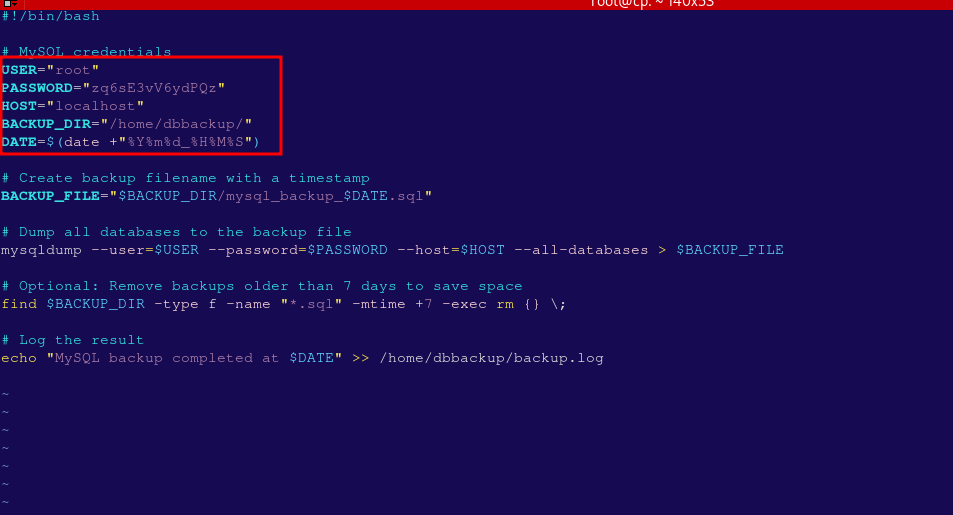
- Add the following code to the script:
#!/bin/bash

# MySQL credentials
USER="your_mysql_user"
PASSWORD="your_mysql_password"
HOST="localhost"
BACKUP_DIR="/home/dbbackup/"
DATE=$(date +"%Y%m%d_%H%M%S")

# Create backup filename with a timestamp
BACKUP_FILE="$BACKUP_DIR/mysql_backup_$DATE.sql"

# Dump all databases to the backup file
mysqldump --user=$USER --password=$PASSWORD --host=$HOST --all-databases > $BACKUP_FILE

# Optional: Remove backups older than 7 days to save space
find $BACKUP_DIR -type f -name "*.sql" -mtime +7 -exec rm {} \;

# Log the result
echo "MySQL backup completed at $DATE" >> /home/dbbackup/backup.log
Note that you need to replace the following in the above script;
- your_mysql_user with your databse user (for all databases, user root)
- your_mysql_password with your database password (password for the root user)
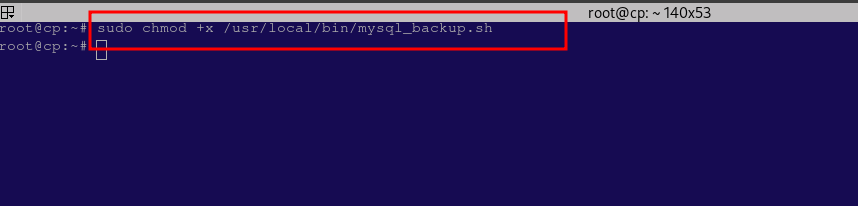
Step 3: Make the Script Executable #
- You need to make the script executable to ensure it runs correctly.
sudo chmod +x /usr/local/bin/mysql_backup.sh
Step 4: Test the Backup Script
- Before automating it with cron, test the script to make sure it works:
sudo /usr/local/bin/mysql_backup.sh

After running this command, check the /home/dbbackup/ directory for the backup file.
Step 5: Set Up a Cron Job #
- Now that your script works, you can set up a cron job to automate the backup process.
- Open the crontab configuration file:
sudo crontab -e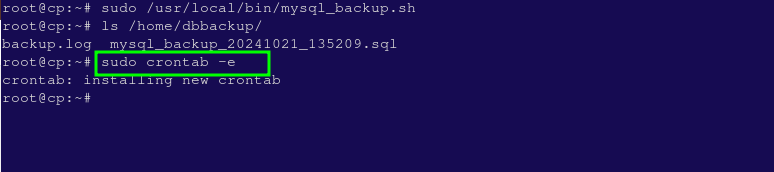
- Add the following cron job to run the backup script daily at 12:00 AM:
0 0 * * * /usr/local/bin/mysql_backup.sh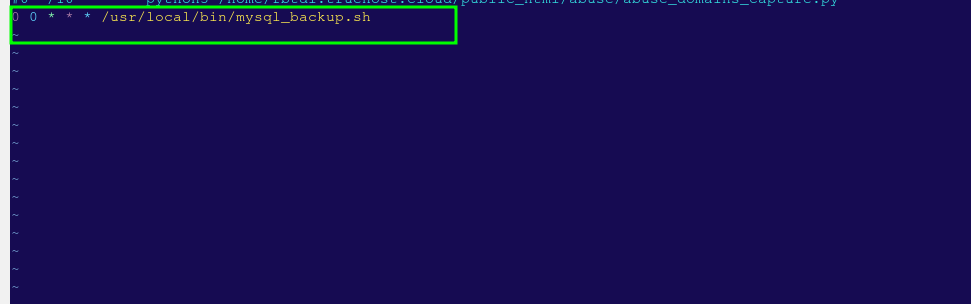
- This sets the cron job to run every day at 12:00 AM. You can adjust the time and frequency as needed.
Step 6: Verify the Cron Job #
Cron jobs are logged in the system log file. You can verify if the cron job runs successfully by checking the logs. Run this command to view the cron logs:
grep CRON /var/log/syslog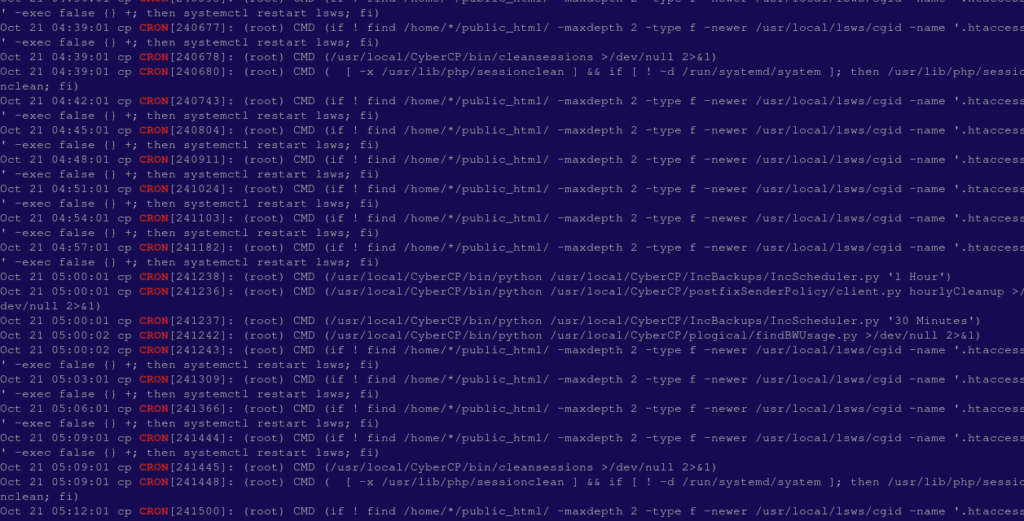
Conclusion #
With this setup, your MySQL databases will be backed up automatically every day at 12:00 AM, and backups older than 7 days will be deleted to save disk space.
You can modify the backup schedule or retention policy by adjusting the cron job or backup script. Regularly check your backups to ensure everything works as expected.
Also this is a sample working script. If you know bash scripting, you can modify the script logic to suite your needs.