Setting up your CyberPanel server for email usage involves configuring essential settings such as the hostname and Reverse DNS (rDNS) for proper mail delivery and security. CyberPanel’s setup wizard makes this process straightforward
Prerequisites #
Before you start, ensure that the following prerequisites are met:
- CyberPanel Installed: CyberPanel must be installed on your server. If it’s not yet installed, follow the CyberPanel installation guide to install it.
- Valid Domain: You should have a domain or subdomain that you plan to use as your server’s hostname for sending emails (e.g.,
mail.example.com). - DNS Access: Ensure you have access to your domain’s DNS settings to configure the necessary records (A, MX, rDNS, etc.). If you have your domain at Truehost, you can use our olitt DNS manager or reach out to our support team for guidance
- Reverse DNS (rDNS) configured for your IP. If your server is with Truehost, please ask the support team to help with setting rDNS to point to your servers hostname and give it 3 hours to propagate.
This is important since if not done, you may run into an error somewhere in the next steps - Server Ports Open: Make sure that SMTP (port 25), IMAP (port 143), and POP3 (port 110) are open in your firewall settings. These will mostly be open by default, thus needing no input from you.
Step-by-Step Guide to Configure CyberPanel for Email #
Step 1: Log in to CyberPanel
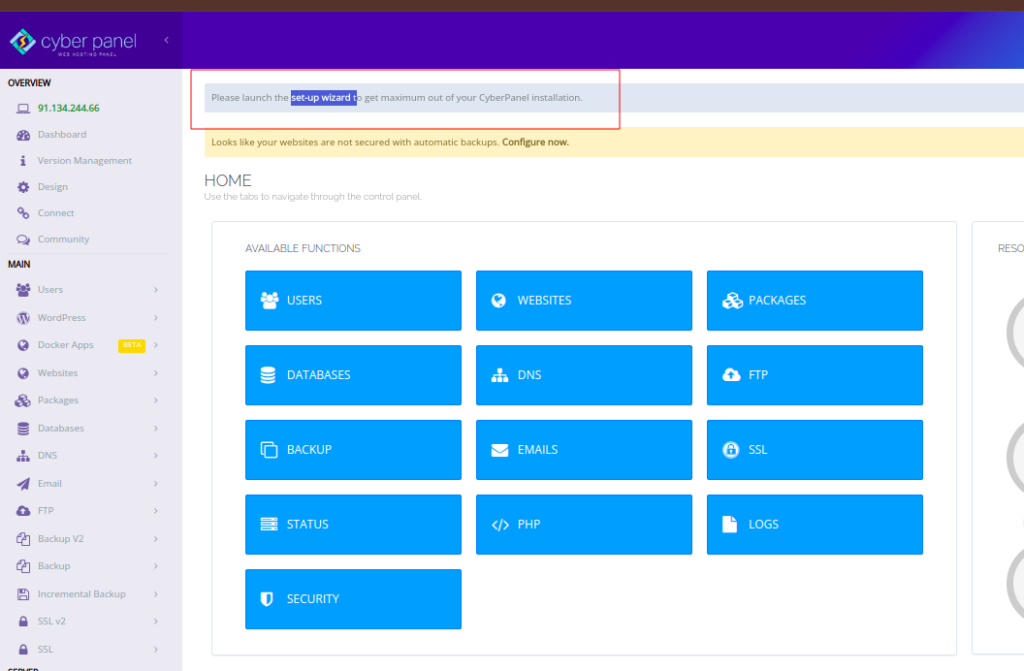
Open your browser and access your CyberPanel server using the IP address or hostname. Check this.
Step 2: Open the Setup Wizard
Upon logging in for the first time, CyberPanel will automatically prompt you with the Setup Wizard.
If the wizard doesn’t appear, you can manually access it by navigating to: Dashboard > Setup Wizard
Step 3: Configure Hostname
The first step in the wizard will guide you to configure the server hostname. The hostname identifies your server on the internet and ensures that outgoing mail is properly routed.
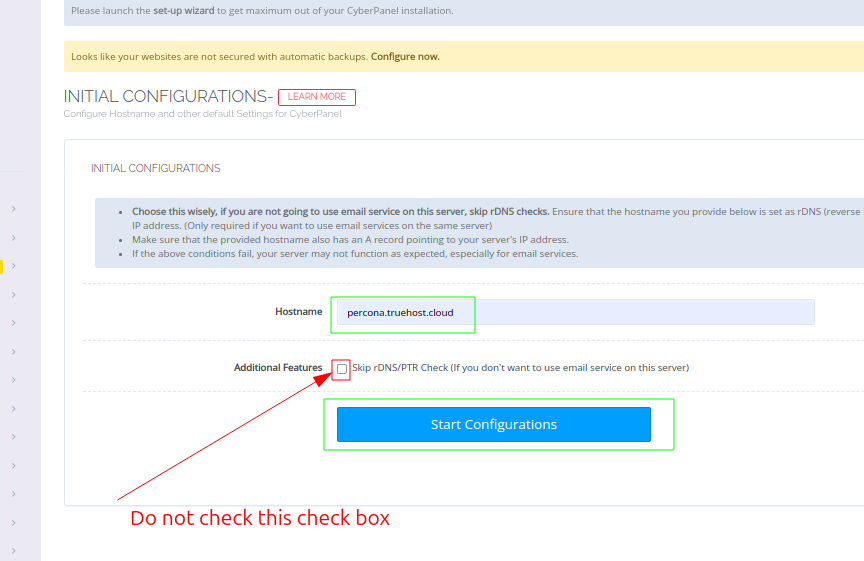
Enter a Valid Hostname: Input a fully qualified subdomain such as mail.example.com. Make sure this domain has a DNS A record pointing to your server’s IP. Set up your hostname using these steps.
Also, you are expected to have set up rDNS for your IP as guided earlier. If you do not do that, you will get an error in this step.
Please use this tool to confirm that your IP has a valid rDNS.
From the drop-down select Reverse Lookup, as in the image below. The desired result should be as in the image.
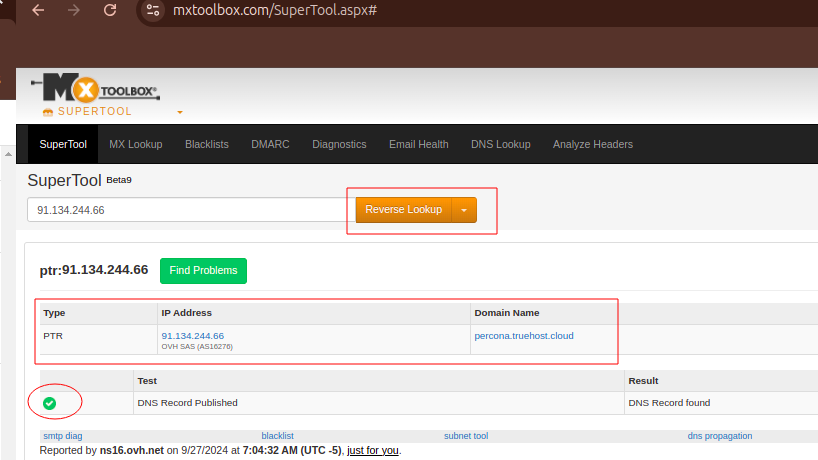
If that is what you have, you may proceed to the next step, otherwise contact our support team to help with rDNS set up, then give it 3 hours to propagate before proceeding. I will proceed since my rDNS is valid as in the image above
Since you are setting the server for email use DO NOT check the checkbox labeled Additional Features.
Instead, click on the large blue button labeled Start Configurations then give it time to congire
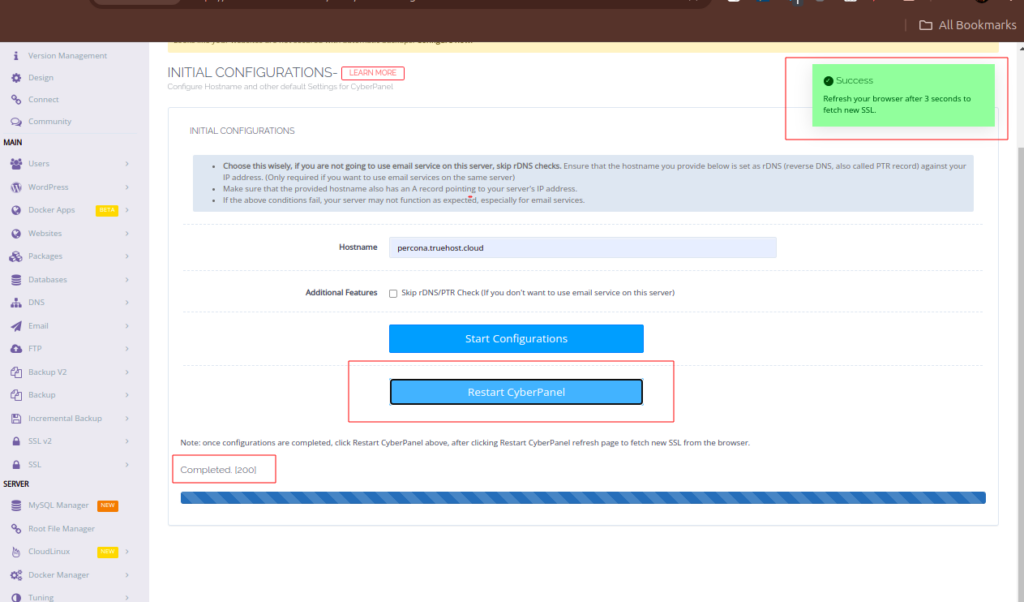
Once configurations are done, you will a complete progress bar, with this message Completed. [200]
You will then Restart Cyberpanel using the large button labeled Restart CyberPanel
Step 4: Configure Email DNS Records (MX, SPF, DKIM, DMARC)
After setting the hostname and rDNS, you’ll need to configure additional DNS records to ensure proper email delivery. You will set up these three DNS records for your domain
Name: mail
Record Type: A (if there exists a record called mail, with type CNAME, change that to A)
Value: 91.134.244.66 (replace this with your actual server IP)
Name: @
Record Type: MX
Priority: 0
Value: mail.yourdoman.com (e.g mail.truehost.cloud) OR simply put your ser’s hostname
Name: @
Record Type: TXT
Value: v=spf1 +a +mx +ip4:178.32.214.84 ~all (carefully replace 178.32.214.84 with your server IP)
Step 5: Test Email Functionality
- Create Email Accounts: To create email accounts, navigate to: Dashboard > Email > Create Email
Select the domain, then create a new email account (e.g.,admin@example.com) - Send a Test Email: Using your newly created email account, send a test email to an external email (e.g., Gmail or Yahoo) to ensure that emails are delivered correctly and aren’t marked as spam.
- Check Email Delivery: Verify that the emails are properly delivered. If there are issues, review your rDNS, SPF, DKIM, and DMARC configurations.